What is Blue-Green deployment?
In simple words, when you are updating your code/resources you need to make sure the shift from your old code to the new one does not impact your users. So it needs to be seamless with absolutely no downtime. Otherwise you are going to lose your customers and I’m pretty sure that’s not what you want. Is it?
So what most developers do is create two parallel environments and they call them (you guessed it right) Blue and Green. Green is the existing production environment (with the old code) and Blue is the new environment (with the new code) which eventually becomes the new Green. When we say Blue-Green deployment we are talking about the shift from Blue to become the new Green, and if you do this whole process right this shift should bring no downtime to your environment.
Blue-Green Deployment on Azure
Depending on your workload there are different ways of doing such deployment on Azure. One of the more common ways of doing such deployment on Azure was to use “Cloud Service” (which is a PaaS service). Beside Blue-Green deployment Cloud Service would also bring you the possibility to autoscale your virtual machines at ease. So it all sounds good and great. Right? Wrong…. Cloud Service is a classic service which also uses the old Azure Service Manager API. Cloud Service is still available on Azure and can be used but Microsoft strongly recommends against using it because soon or late they are going to get rid of Azure Service Manager API.
Instead Microsoft suggests the use of Azure Resource Manager (ARM) API but what is an alternative to Cloud Service on ARM? Depending on your code and resources you could use App Service as well as Service Fabric on Azure. But today in this blog post we do Blue-Green deployment using VM Scale Sets. This way you can use Virtual Machines hosting your code and have the possibility to auto scale based on specific rules. These rules are based on the usage of CPU, memory, and etc. and trigger a scale-up or down when the usage is too high or low. (In this blog post we are not focusing much on the auto-scaling rules because that is not the main question for many but we focus mainly on the whole architecture and code).
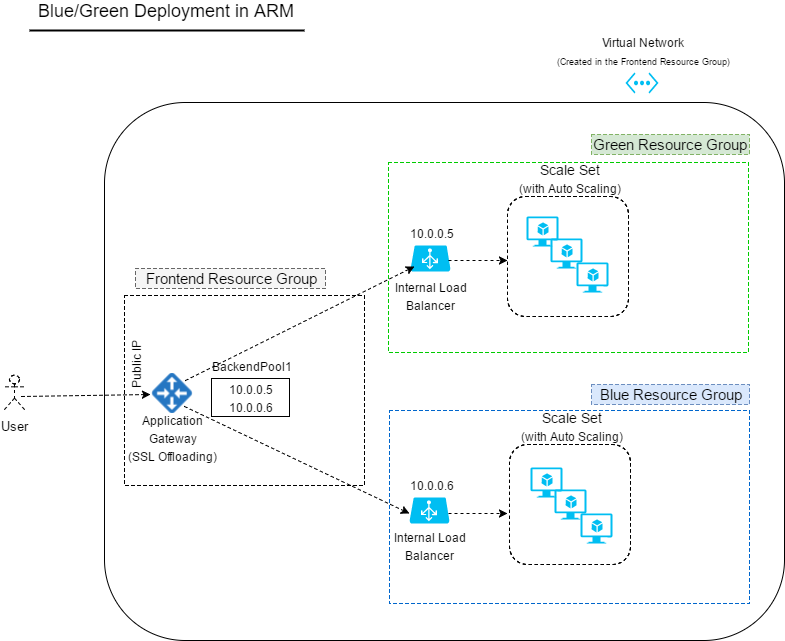
Blue-Green Architecture on Azure Resource Manager
The diagram below shows the overall architecture. You deploy your resources into resource groups. In this diagram we have one resource group for the Green environment (which has the old code) and one resource group for the Blue environment (which has the new code). Your code is hosted on virtual machines which are part of a VM Scale Set (VMSS). The VMSS uses a custom OS image to spin up new virtual machines.
Everything inside the resource group has a private IP address. In each resource group there is an Internal Load Balancer with also a private frontend IP address which load balances the incoming traffic across the backend VMs.
The Virtual Network is defined inside the frontend resource group and all the resoruces in different resource groups are all members of the same virtual network (in different subnets though). The Application Gateway in the frontend resource group receives all incoming traffic and delivers it to the backend Load Balancers.
Now take the steps below to deploy
Here are the steps you are going to have to take:
- Deploy the frontend resource group
- Deploy the Green resource group (considering it has your old code)
- Deploy the Blue resource group (considering it has your new code)
- Redirect the traffic from the Green resource group to the Blue resource group (or in other words SWAP)
To deploy the Green or Blue resource group you need to host/install your new code on a VM, generlize the VM, shut it down, and then provide a reference to the image (URI) in the code which comes in this post.
Deploy the Frontend Resource Group
The code below needs to be executed only once and not with every new deployment:
#Create an application gateway in the frontend resource group which has a backend address pool
#with static IP addresses pointing to the backend resource groups (This is a one-time execution and not part of the automation)

$Credential = Get-Credential
Add-AzureRmAccount -Credential $Credential
Select-AzureRmSubscription -SubscriptionId "Put your subscription ID here"

$frontendrg = "Frontend-P-RG"
$loc = "West Europe"
$vnetname = "bgvnet"

New-AzureRmResourceGroup -Name $frontendrg -Location $loc -Force;

$subnetMain = New-AzureRmVirtualNetworkSubnetConfig -Name "main" -AddressPrefix 10.0.0.0/24
$subnetGreen = New-AzureRmVirtualNetworkSubnetConfig -Name "green" -AddressPrefix 10.0.1.0/24
$subnetAppGW = New-AzureRmVirtualNetworkSubnetConfig -Name "appgw" -AddressPrefix 10.0.2.0/24

$vnet = New-AzureRmVirtualNetwork -Name $vnetname -ResourceGroupName $frontendrg -Location $loc -AddressPrefix 10.0.0.0/8 -Subnet $subnetGreen,$subnetMain,$subnetAppGW

$subnetGreen=$vnet.Subnets[0]
$subnetMain=$vnet.Subnets[1]
$subnetAppGW=$vnet.Subnets[2]

$publicip = New-AzureRmPublicIpAddress -ResourceGroupName $frontendrg -name publicIP01 -location $loc -AllocationMethod Dynamic

$gipconfig = New-AzureRmApplicationGatewayIPConfiguration -Name gatewayIP01 -Subnet $subnetAppGW

$pool = New-AzureRmApplicationGatewayBackendAddressPool -Name pool01 -BackendIPAddresses 10.0.0.5

$poolSetting01 = New-AzureRmApplicationGatewayBackendHttpSettings -Name "besetting01" -Port 80 -Protocol Http -CookieBasedAffinity Disabled -RequestTimeout 120

$fp = New-AzureRmApplicationGatewayFrontendPort -Name frontendport01  -Port 80

$fipconfig = New-AzureRmApplicationGatewayFrontendIPConfig -Name fipconfig01 -PublicIPAddress $publicip

$listener = New-AzureRmApplicationGatewayHttpListener -Name listener01 -Protocol Http -FrontendIPConfiguration $fipconfig -FrontendPort $fp

$rule = New-AzureRmApplicationGatewayRequestRoutingRule -Name rule01 -RuleType Basic -BackendHttpSettings $poolSetting01 -HttpListener $listener -BackendAddressPool $pool

$sku = New-AzureRmApplicationGatewaySku -Name Standard_Small -Tier Standard -Capacity 2

$appgw = New-AzureRmApplicationGateway -Name bgappgw -ResourceGroupName $frontendrg -Location $loc -BackendAddressPools $pool -BackendHttpSettingsCollection $poolSetting01 -FrontendIpConfigurations $fipconfig  -GatewayIpConfigurations $gipconfig -FrontendPorts $fp -HttpListeners $listener -RequestRoutingRules $rule -Sku $sku
Deploy the Blue/Green Resource Group
The code below is the same for both blue or green environment, you just need to change the value of some of the variables. Follow the comments in the code:
#Creates a resource group with a load balancer inside which has a frontend private ip address. In the end of this section this script also creates a vm scale set.

$Credential = Get-Credential

Add-AzureRmAccount -Credential $Credential

Select-AzureRmSubscription -SubscriptionId "Put your subscription ID here"

$greenrg = "Green-P-RG" #This needs to be be changed with every new deployment
$frontendrg = "Frontend-P-RG"
$loc = "West Europe"
$vnetname = "bgvnet"
$LBFrontendNewPrivateIPAddress = "10.0.0.5" #This is the frontend IP address of the load balancer and should be changed with every new deployment and should be in the same range as the main subnet
$vmssName = 'haufevmssgreenbg'; #This has to be a unique name and needs to be changed with every new deployment
$imageuri = "This is the URI to your image which hosts your code" #This has to be a new image URI with every new deployment

#Specify VMSS Specific Details
$adminUsername = 'esmaeil';
$adminPassword = "P@ssw0rd12345";

$PublisherName = 'MicrosoftWindowsServer'
$Offer         = 'WindowsServer'
$Sku          = '2012-R2-Datacenter'
$Version       = 'latest'
$vmNamePrefix = 'winvmss'

#Add an Extension
$extname = 'BGInfo';
$publisher = 'Microsoft.Compute';
$exttype = 'BGInfo';
$extver = '2.1';

#Specify Number of Nodes
$numberofnodes = 3

$backendSubnetName = "green"

New-AzureRmResourceGroup -Name $greenrg -Location $loc -Force;

$vnet= Get-AzureRmVirtualNetwork -Name $vnetname -ResourceGroupName $frontendrg

$subnetMain = Get-AzureRmVirtualNetworkSubnetConfig -Name "green" -VirtualNetwork $vnet

$subnetMain = $vnet.Subnets[1]

$frontendIP = New-AzureRmLoadBalancerFrontendIpConfig -Name LB-Frontend -PrivateIpAddress $LBFrontendNewPrivateIPAddress -SubnetId $vnet.subnets[1].Id

$beaddresspool= New-AzureRmLoadBalancerBackendAddressPoolConfig -Name "LB-backend"

$inboundNATRule1= New-AzureRmLoadBalancerInboundNatRuleConfig -Name "RDP" -FrontendIpConfiguration $frontendIP -Protocol TCP -FrontendPort 3389 -BackendPort 3389

$healthProbe = New-AzureRmLoadBalancerProbeConfig -Name "HealthProbe" -RequestPath "index.html" -Protocol http -Port 80 -IntervalInSeconds 15 -ProbeCount 2

$lbrule = New-AzureRmLoadBalancerRuleConfig -Name "HTTP" -FrontendIpConfiguration $frontendIP -BackendAddressPool $beAddressPool -Probe $healthProbe -Protocol Tcp -FrontendPort 80 -BackendPort 80

$nrplb = New-AzureRmLoadBalancer -ResourceGroupName $greenrg -Name "NRP-LB" -Location $loc -FrontendIpConfiguration $frontendIP -InboundNatRule $inboundNATRule1 -LoadBalancingRule $lbrule -BackendAddressPool $beAddressPool -Probe $healthProbe

$backendSubnet = Get-AzureRmVirtualNetworkSubnetConfig -Name $backendSubnetName -VirtualNetwork $vnet

$backendnic1= New-AzureRmNetworkInterface -ResourceGroupName $greenrg -Name lb-nic1-be -Location $loc -Subnet $backendSubnet -LoadBalancerBackendAddressPool $nrplb.BackendAddressPools[0] -LoadBalancerInboundNatRule $nrplb.InboundNatRules[0]

#The code below creates a vm scale set

$vnet= Get-AzureRmVirtualNetwork -Name $vnetname -ResourceGroupName $frontendrg

$ILB = Get-AzureRmLoadBalancer -Name "NRP-LB" -ResourceGroupName $greenrg

$backendSubnet = Get-AzureRmVirtualNetworkSubnetConfig -Name $backendSubnetName -VirtualNetwork $vnet

$subnetId = (Get-AzureRmVirtualNetworkSubnetConfig -Name $backendSubnetName -VirtualNetwork $vnet).Id

$vmssipconf_ILB_BEAddPools = $ILB.BackendAddressPools[0].Id

$ipCfg = New-AzureRmVmssIPConfig -Name 'nic' -LoadBalancerBackendAddressPoolsId $vmssipconf_ILB_BEAddPools -SubnetId $subnetId;

$vmss = New-AzureRmVmssConfig -Location $loc -SkuCapacity $numberofnodes -SkuName 'Standard_DS3' -UpgradePolicyMode 'automatic' `
| Add-AzureRmVmssNetworkInterfaceConfiguration -Name $backendSubnet -Primary $true -IPConfiguration $ipCfg `
| Set-AzureRmVmssOSProfile -ComputerNamePrefix $vmNamePrefix -AdminUsername $adminUsername -AdminPassword $adminPassword `
| Set-AzureRmVmssStorageProfile -Name "test" -OsDiskCreateOption 'FromImage' -OsDiskCaching ReadWrite -OsDiskOsType Windows -Image $imageuri `
| Add-AzureRmVmssExtension -Name $extname -Publisher $publisher -Type $exttype -TypeHandlerVersion $extver -AutoUpgradeMinorVersion $true

New-AzureRmVmss -ResourceGroupName $greenrg -Name $vmssName -VirtualMachineScaleSet $vmss -Verbose;
Swap between the Green and Blue Environments
The code below will update the backend pool in the frontend Application Gateway to point to the new Green (currently called Blue) resource group load balancer:
#The section below updates the application gateway in the frontend resource group with the new IP address

$Credential = Get-Credential

Add-AzureRmAccount -Credential $Credential

Select-AzureRmSubscription -SubscriptionId "Put your subscription ID here"

$frontendrg = "Frontend-P-RG"
$LBFrontendNewPrivateIPAddress = "10.0.0.5" #This is the IP address of the frontend load balancer in the new resource group. This is going to be the new green.
$LBFrontendOldPrivateIPAddress = "10.0.0.6" #This is the IP address of the frontend load balancer in the old resource group.

$frontendappgw = Get-AzureRmApplicationGateway -Name "bgappgw" -ResourceGroupName $frontendrg

$frontendappgw | Set-AzureRmApplicationGatewayBackendAddressPool -Name pool01 -BackendIPAddresses $LBFrontendOldPrivateIPAddress,$LBFrontendNewPrivateIPAddress

Set-AzureRmApplicationGateway -ApplicationGateway $frontendappgw

$frontendappgw = Get-AzureRmApplicationGateway -Name "bgappgw" -ResourceGroupName $frontendrg

$frontendappgw | Set-AzureRmApplicationGatewayBackendAddressPool -Name pool01 -BackendIPAddresses $LBFrontendNewPrivateIPAddress

Set-AzureRmApplicationGateway -ApplicationGateway $frontendappgw
Once you run the code above the incoming traffic to your frontend Application Gateway will slowly redirect the traffic to the new resource group. It is very seamless and there is absolutely zero downtime. In case you have any questions in understanding any parts of the code, please let me know in the comments.